How to create a custom SCSM console task by using some SDK and XML magic
This blog post is should give you a overview of how to create your own custom Service Manager console task by using some C# and XML magic :-) My example task will show a computer’s IP address in a Popup form.
First of all, there are basically two different types of tasks in Service Manager. Travis Wright published a very good overview on Service Manager tasks in a blog post back in 2011. His post is a must-read before continuing with creating your own custom task. The post covers also some details about security and permissions when working with tasks.
As Travis describes in his post, all the tasks you see on the right hand side of the Service Manager console or forms are Console Tasks. Furthermore, Console Tasks have the following properties:
- They run locally on the computer where the console runs
- They run under the same security context as the console runs
- They even run in the same process as the Service Manager console (Microsoft.EnterpriseManagement.ServiceManager.UI.Console.exe).
As you may know, you can define some basic tasks in the Tasks view of Service Manager console using the Create Task wizard. However your options there are pretty limited. You can only configure these tasks to run external programs or scripts. Since the tasks are executed locally on the computer where the console runs one has to make sure the programs and scripts can be executed. I will not cover creation of such tasks in this post
So, what do you need to develop your own custom Service Manager console task?
- You definitely need some C# dev skills. Not that much that you have to name you Software Engineer but some basic skills.
- You need to know Service Manager SDK if you want to interact with your Service Manager environment.
- I would recommend to use Visual Studio Authoring Extensions
- You have to target .NET Framework 3.5 when developing your assemblies.
First of all some basics to understand when developing a custom assembly which holds the magic of your task. Your custom task class has to inherit the class ConsoleCommand which can be found in Microsoft.EnterpriseManagement.UI.SdkDataAccess.dll. This library as long with others you may need can be found in the Service Manager installation directory.
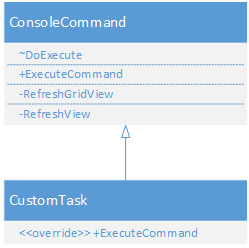
Now you have to put your code in the right place so that it will be executed when running your task. This means after inheriting ConsoleCommand, the ExecuteCommand method has to be overwritten with your custom code you want to have executed when running your console task. So create a new Visual Studio Class Library project and change your Class so that it derives from ConsoleCommand.
    public class TaskHandler : ConsoleCommand
            {
The following code will show the ExecuteCommand method which displays the IP address of the selected computer object. There is a small difference depending on whether your task is started from a view or from a form. So it is necessary to check whether the task is run from a view or from a form.
Also you should surround your code with a foreach loop because it is possible that a Console Task is configured to allow the selection of multiple objects.
    //Property ID with $
    internal const string MP_PROPERTY_ID_DOLLAR = "$Id$";
    //Microsoft.Windows.Computer.ProjectionType TypeProjection Guid
    internal const string MP_PROJECTION_TYPE_COMPUTER = "c95d4106-3f24-d3cc-232e-9f51198b295c";

    public override void ExecuteCommand(IList<navigationmodelnodebase> nodes, NavigationModelNodeTask task, ICollection<string> parameters)
    {
        //There will only ever be one item because we are going to limit this task to single select
        foreach (NavigationModelNodeBase node in nodes)
        {
            IDataItem dataItemComputer = null;

            //Check if task was started from form
            bool startedFromForm = FormUtilities.Instance.IsNodeWithinForm(nodes[0]);

            //If started from form
            if (startedFromForm)
            {
                //Get Computer object instance
                dataItemComputer = FormUtilities.Instance.GetFormDataContext(node);
                MessageBox.Show("IP Address from form: " + dataItemComputer["IPAddress"] as String);
            }
            //Else started from view
            else
            {
                IDataItem dataItemNode = node;
                if (dataItemNode != null)
                {
                    //Get Computer object instance from selected navigationNode
                    dataItemComputer = ConsoleContextHelper.Instance.GetProjectionInstance((Guid)dataItemNode[MP_PROPERTY_ID_DOLLAR], new Guid(MP_PROJECTION_TYPE_COMPUTER));
                }
                MessageBox.Show("IP Address from view: " + dataItemComputer["IPAddress"] as String);
            }
        }
    }
Depending on where the task is run, the code used to get the IDataItem representation of the selected Computer object is slightly different. When running from a view, you can work with FormUtilities class found in Microsoft.EnterpriseManagement.ServiceManager.Application.Common assembly whereas when running the task from a view, ConsoleContextHelper class found in Microsoft.EnterpriseManagement.UI.Extensions can be used. At this point I also have to point out that the IDataItem interface is not a supported or documented part of the SDK.
To import your task into Service Manager you have to define it in a Management Pack and bundle the Management Pack together with your custom assembly. You can create a new Management Pack in Service Manager Authoring Tool or even better with Visual Studio Authoring Extensions.
Lets get started with the Management Pack by adding some references to other Service Manager Management Packs. If you are going to use Visual Studio Authoring Extensions, you only have to add a reference to the _Microsoft.EnterpriseManagement.ServiceManager.UI.Console _Management Pack but I am going to cover all necessary references for the sake of completeness.
    <References>
          <Reference Alias="Console">
            <ID>Microsoft.EnterpriseManagement.ServiceManager.UI.Console</ID>
            <Version>7.5.1561.0</Version>
            <PublicKeyToken>31bf3856ad364e35</PublicKeyToken>
          </Reference>
          <Reference Alias="Windows">
            <ID>Microsoft.Windows.Library</ID>
            <Version>7.5.8501.0</Version>
            <PublicKeyToken>31bf3856ad364e35</PublicKeyToken>
          </Reference>
          <Reference Alias="System">
            <ID>System.Library</ID>
            <Version>7.5.8501.0</Version>
            <PublicKeyToken>31bf3856ad364e35</PublicKeyToken>
          </Reference>
    </References>
Then add a Category for representing the Management Pack. If you don’t, your task will not show up in the console. This category tells Service Manager that the Management Pack is designed to run in Service Manager. Without this category, Service Manager would assume that the Management Pack is designed for Operations Manager and it won’t show Console Tasks. If you are going to seal the Management Pack, and you should :-) you also have to make sure you include the Management Pack public key token.
    <Categories>
        <Category ID="Category.scsmlab.showcomputeripaddress.task" Value="Console!Microsoft.EnterpriseManagement.ServiceManager.ManagementPack">
          <ManagementPackName>scsmlab.showcomputeripaddress.task</ManagementPackName>
          <ManagementPackVersion>1.0.0.0</ManagementPackVersion>
          <ManagementPackPublicKeyToken>8275f1180deadcc4</ManagementPackPublicKeyToken>
        </Category>
    </Categories>
You can also optionally add another Category which targets your custom task to define where it should show up in SCSM console. For example you can make the task available in the root Work Item folder by using the following category.
<Category ID="Category.scsmlab.showcomputeripaddress.task.workitems" Target="ShowIPTask" Value="ServiceManagerWorkItem!Microsoft.EnterpriseManagement.ServiceManager.UI.Console.WorkItemFolderTasks" />
By adding the Category outlined below you can enable your task to support multi-select. The Target attribute just has to target the task which supports multi-select.
<Category ID="Category.scsmlab.showcomputeripaddress.task.multiselect" Target="ShowIPTask" Value="Console!Microsoft.EnterpriseManagement.ServiceManager.UI.Console.MultiSelectTask" />
The XML definition of a task looks like the following. You are free to choose any ID for your task. The ConsoleTask Target attribute defines for which class the task will be visible. This means that whenever a object of this class is selected, the task will show up in the Service Manager Console Task Pane. Assembly and Handler elements should always be the same.
Furthermore there are two Argument elements named Assembly and _Type _which contain on the one hand the ID of the assembly resource defined in the Management Pack (we will cover this later on in this post) and on the other hand the name of the class where the ConsoleCommand.ExecuteCommand() method resides. Be sure to use the fully qualified name of the class (e.g. TestTask.TaskHandler). There can be a third argument added to the task definition which can be anything you want to pass it to the ExecuteCommand() method. This argument may be used to provide context of what the task has to do when it gets executed.
    <ConsoleTasks>
          <ConsoleTask ID="ShowIPTask" Accessibility="Public" Enabled="true" Target="Windows!Microsoft.Windows.Computer" RequireOutput="false">
            <Assembly>Console!SdkDataAccessAssembly</Assembly>
            <Handler>Microsoft.EnterpriseManagement.UI.SdkDataAccess.ConsoleTaskHandler</Handler>
            <Parameters>
              <Argument Name="Assembly">showcomputeripaddress</Argument>
              <Argument Name="Type">showcomputeripaddress.TaskHandler</Argument>
            </Parameters>
          </ConsoleTask>
    </ConsoleTasks>
Don’t forget to add a shiny icon for your new task :-)
    <ImageReferences>
          <ImageReference ElementID="ShowIPTask" ImageID="ShowIPAddress24x24" />
    </ImageReferences>
Last but not least, you will have to include your new assembly and the image file as a resource so it can be imported with the Management Pack. Make sure the Assembly resource is placed above of the image resource.
    <Resources>
        <Assembly ID="showcomputeripaddress" Accessibility="Public" FileName="showcomputeripaddress.dll" HasNullStream="false" QualifiedName="showcomputeripaddress, Version=1.0.0.0, Culture=neutral, PublicKeyToken=8275f1180deadcc4" />
        <Image ID="ShowIPAddress24x24" Accessibility="Public" HasNullStream="false" FileName="showIPAddress24.png" />
    </Resources>
Signing your Management Pack and including it together with your new assembly as well as your image files in a Management Pack Bundle is pretty straightforward when using Visual Studio Authoring Extensions. See one of my previous blog post for a more detailed instructions. If you are not using VSAE, start by looking at this blog post by Rob Ford on how to seal a Management Pack.
Et voilà, your new task should show up in your Service Manager Console and the IP address of a computer object is now just one click away :-)
