Install SCSM Exchange Connector in Resource Forest Environment
Lately I had to deal with a SCSM Exchange Connector Installation in a Resource Forest Active Directory environment. There was a AD forest which contained Exchange Server and the SCSM environment was placed in another forest. Between these two forests, a two-way trust was established.
Furthermore there was a requirement to setup two Exchange Connectors with two different mailboxes so that our customer was able to send messages to either a Incident or a Service Request mailbox. As we know, the Exchange connector always runs under the security context of the Workflow Run As Account. So to meet this criteria, I had to configure the Exchange connector to allow impersonation for other accounts. Otherwise the Workflow Run As Account can only access its own mailbox.
The first steps of the installation do not differ from any other Exchange Connector installation. But instead of creating a normal Exchange mailbox for your Workflow Run As Account, you have to create a linked mailbox because the Workflow Run As Account and the Exchange Server do not reside in the same forest.
So, start by downloading and installing Exchange Connector and the 64-bit Exchange Web Services Managed API Client DLL (Microsoft.Exchange.WebServices.dll) which can be found here: http://www.microsoft.com/en-us/download/details.aspx?id=30141. As of version 3.0 released in October 2013, Exchange Connector is now officially supported for Service Manager 2012 SP1 and 2012 R2 https://www.microsoft.com/en-us/download/details.aspx?id=45291
Afterwards create your Exchange mailboxes (e.g. it-incident@scsmlab.com and it-servicerequest@scsmlab.com)
Now allow impersonation of the two mailboxes created above by executing the following commands in the Exchange PowerShell. Since I am pretty far away from being a Exchange expert, these commands may eventually be not as optimized as they could be ;)
First create some management scopes if you do not want to allow impersonation for all accounts.
    New-ManagementScope -Name: 'Exchange Impersonation Incident' -RecipientRestrictionFilter 'Name -eq "it-incident"'
    New-ManagementScope -Name: 'Exchange Impersonation Service Request' -RecipientRestrictionFilter 'Name -eq "it-servicerequest"'
Now I can allow impersonation for my Workflow Run As Account for both of the newly created mailboxes
    New-ManagementRoleAssignment -Name 'Exchange Impersonation Incident' -Role ApplicationImpersonation -User srv-scsm-workflow -CustomRecipientWriteScope 'Exchange Impersonation Incident'
    New-ManagementRoleAssignment -Name 'Exchange Impersonation Service Request' -Role ApplicationImpersonation -User srv-scsm-workflow -CustomRecipientWriteScope 'Exchange Impersonation Service Request'
Perfect, impersonation should now be working. Now copy the following files either from your Exchange server or from your Exchange Connectors download directory to the SCSM installation directory on the SCSM management server where you are running workflows and wherever you plan to use a console to configure the Exchange connector (C:Program FilesMicrosoft System Center 2012Service Manager for Service Manager 2012):
- Microsoft.SystemCenter.ExchangeConnector.dll (Downloaded with Exchange Connector)
- Microsoft.Exchange.WebServices.dll (From Exchange Server C:Program FilesExchangeExchange Web Services2.1)
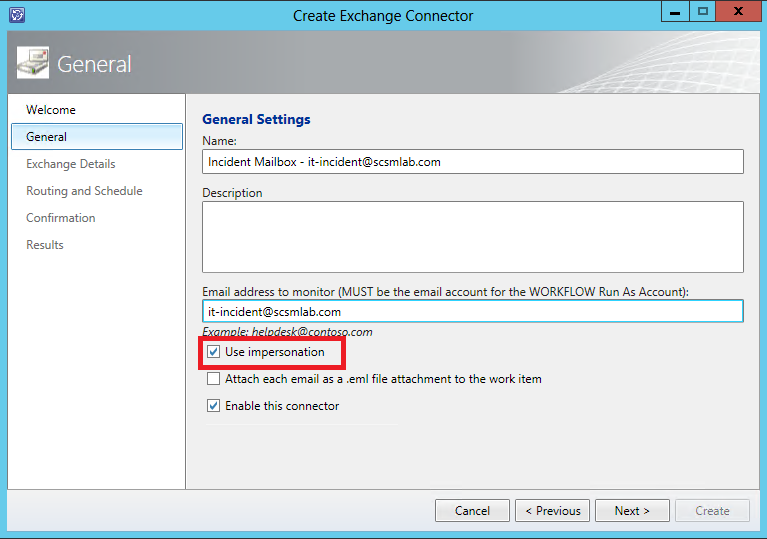
Import the Exchange Connector management packs into Service Manager and when creating the Exchange connector select “Use Impersonation” for the account you want to monitor.
When I was creating the connector I ran into the problem that the connector was not able to fetch mails from Exchange. The Event Log showed the following error:
Exception Message: Autodiscover blocked a potentially insecure redirection to https://webmail.scsmlab.com/autodiscover/autodiscover.xml.
To allow Autodiscover to follow the redirection, use the
AutodiscoverUrl(string, AutodiscoverRedirectionUrlValidationCallback) overload.
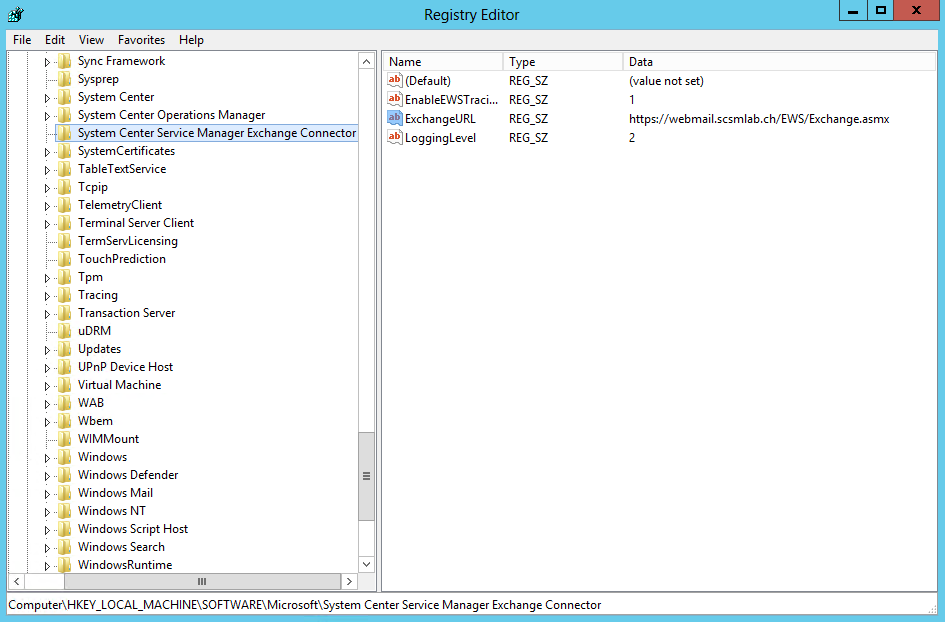
I disabled Autodiscovery by adding the following registry key and value to prevent the error:
- Registry Key: “HKEY_LOCAL_MACHINESOFTWAREMicrosoftSystem Center Service Manager Exchange Connector”
- String value: ExchangeURL (https://webmail.scsmlab.com/EWS/Exchange.asmx)
By the way, to enable deeper logging of Exchange connector events, you can create the following String values in the same Registry Key as used above:
- EnableEWSTracing: 1
- LoggingLevel: 7

