Working with Windows Azure Pack Service Management API: Creating new users
As you may already know, Windows Azure Pack is a collection of Windows Azure technologies, available for installation into your data center. It runs on top of Windows Server 2012 R2 and System Center 2012 R2 and enables you to offer a portal to your customers which is consistent with the public Windows Azure experience.
Windows Azure Pack provides a so called Service Management API which is a collection of REST APIs that provide extensibility for Service Management. So when it comes to using Windows Azure Pack in your datacenter, there is a good chance that the Windows Azure Pack Service Management API will eventually help you to automate some tasks :-)
Amongst others, the Service Management API consist of the following interfaces:
-
Administrator interfaces The Admin REST APIs that are only available to Service Management for administrators. By default, the port number in the URI has to be 30004.
-
Tenant interfaces These are REST APIs that enable tenants to manage and configure cloud services that are included in the plans to which they subscribe. By default, the port number in the URI has to be 30005.
Unfortunately, at the moment, there exists only little documentation about how to use the WAP Service Management API. Fortunately I was backed by the WAP product team when trying my first steps with WAP Service Management API calls. Thanks to Shriram, Yoav and Walter for their excellent assistance!
Since I had to deal with a request to create new users by using the WAP Service Management API recently, I will focus on this task. Maybe I will add another post about how to work with subscriptions and plans later on.
To create a new user we are going to use the Administrator interface as well as the Admin Authentication Site to get a Security Token for the Admin APIs. Assuming that you installed Windows Azure Pack as an express deployment as described under http://technet.microsoft.com/en-us/library/dn296439.aspx, you will have to use the following URI’s:
-
Admin Authentication Site: https://localhost:30072
-
Admin APIs: https://localhost:30004
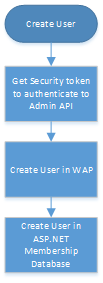
The necessary, high-level steps to create a WAP user are listed below.
First of all you will have to get an Security token to be able to authenticate to the Admin APIs. Windows Azure Pack uses claims based authentication to grant access to the Administrator and Tenant interfaces. When making API calls, you will need to present a security token from a trusted Security Token Service (STS). You will have to pass the Security token as a Bearer token in the header of each request. In my example, I am going to get a Security Token from the Admin Authentication Site which is a Windows Authentication (Kerberos/NTLM) based STS that picks up the currently logged-on user’s credentials and issues a Security Token for authorized users. For more information about claims based authentication in WAP see this document.
Getting the Security Token from Admin Authentication Site can be done by using a sample PowerShell script shipped with Windows Azure Pack. The script can be found in C:Program FilesManagement PowerShellAPISamplesAuthenticationGet-TokenWindows.ps1. The received token is valid for 8 hours. As client realm parameter you need to pass http://azureservices/AdminSite
.Get-TokenWindows.ps1 -allowSelfSignCertificates -authSiteAddress https://localhost:30072 -clientRealm http://azureservices/AdminSite
Now to actually call the API, Firefox RESTClient Addon can be used. Make sure you visit the URIs first and add the self-signed certificate to the Firefox CertStore before making API calls.
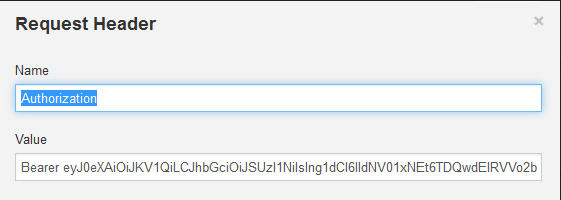
Add the following custom headers:
-
Authorization: Bearer
-
Content-Type: application/json
-
Accept: application/json
The authorization header contains the Security token received.
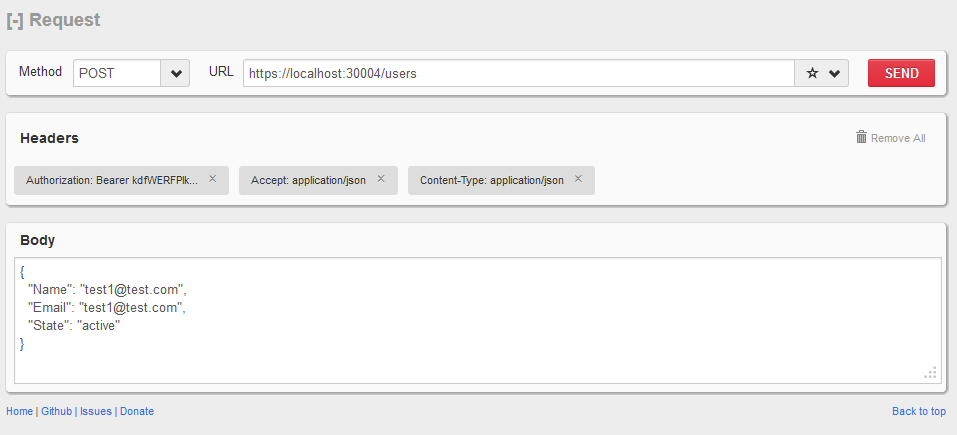
The following POST request creates a new user in Windows Azure Pack. The request body has to contain _Name, Email _ and State.
Of course it is also possible to make calls to the APIs by using some C# magic :-) Below you can find a small sample which describes how to create a user by calling the Admin APIs with C#. Keep in mind that I am not a developer so there may be room for improvement :-)
string EnvironmentToUse = "https://localhost";

// POST request create user
using (HttpClient client = new HttpClient())
{
      client.BaseAddress = new Uri(EnvironmentToUse + ":30004");

      // Add an Accept header for JSON format.
      client.DefaultRequestHeaders.Accept.Add(new MediaTypeWithQualityHeaderValue("application/json"));
      // Add Authorization header
      client.DefaultRequestHeaders.Authorization = new AuthenticationHeaderValue("Bearer", token);

      // Create request body
      string content = "{"name":"test1@test.com", "email":"test1@test.com", "state":"active"}";

      // Send request and get response
      var response = client.PostAsync(EnvironmentToUse + ":30004/users", new StringContent(content, Encoding.UTF8, "text/json")).Result;
      response.EnsureSuccessStatusCode();
      Console.WriteLine("Response:");
      Console.WriteLine(response.Content.ReadAsStringAsync().Result);
}
Anyhow, the above request will only create a user account in the Service Management API layer and not the actual ASP.Net membership provider. This means that the user that was created using this API call will not be able to login to the portal. Hence, if a new user is to be created and have access to the portal, the user information (username, password, email) must also be added to the Membership Database (dbo.aspnet_Membership and dbo.aspnet_Users tables in Microsoft.MgmtSvc.PortalConfigStore database).
To add users to the Membership database, the ASP.NET Membership API has to be used, which connects to the database directly and performs operations on it. Connecting to the Membership database can be done by defining a Membership Provider like the following in your app.conf file. Note that I am using password compatibility mode Framework40.
<membership defaultProvider="SqlProvider">
    <providers>
        <add
          name="SqlProvider"
          type="System.Web.Security.SqlMembershipProvider"
          connectionStringName="LABSQL"
          applicationName="/"
          enablePasswordRetrieval="false"
          enablePasswordReset="true"
          requiresQuestionAndAnswer="false"
          requiresUniqueEmail="false"
          passwordFormat="Hashed"
          maxInvalidPasswordAttempts="5"
          passwordAttemptWindow="10"
          passwordCompatMode="Framework40" />
    </providers>
</membership>
The user can then be created by using the following code. You can also use the Membership class to update and delete users. More information about the Membership class can be found on MSDN.
MembershipUser membershipUser = Membership.CreateUser(username, password, email);
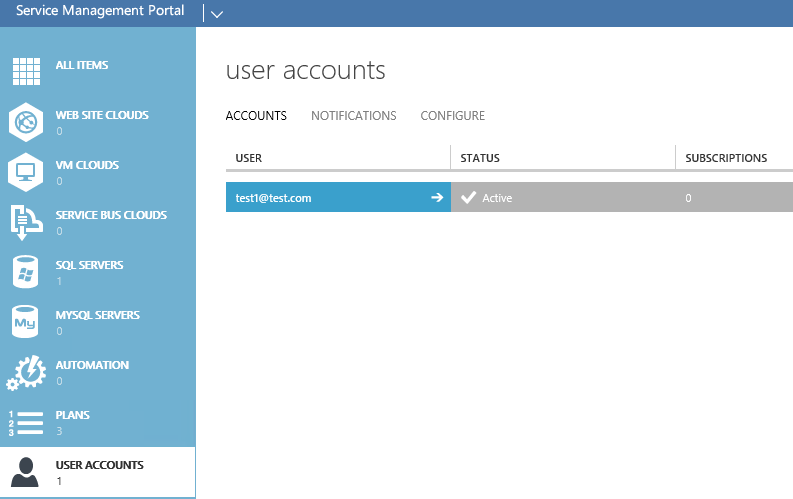
Congrats! The newly created user is now visible in your Service Management Portal and you should be able to log-in with the password specified when creating the membership user. Have fun! :-)


