Installing Service Manager 2016 Data Warehouse Management Server
This is the fourth part of a blog post series called “Installing Service Manager 2016 Data Warehouse” and will cover how to install a Service Manger 2016 Data Warehouse server on Windows Server 2016 with Desktop Experience.
- Installing Service Manager 2016 Part 1: What’s new
- Installing Service Manager 2016 Part 2: Primary Management Server
- Installing Service Manager 2016 Part 3: Self Service Web Portal
- Installing Service Manager 2016 Part 4: Data Warehouse Management Server (this post)
- Installing Service Manager 2016 Part 5: Scripting the installation
In this blog post series I will describe the installation of Service Manager 2016 based on a pretty simple 3 computer scenario. The first computer hosts the Service Manager management server as well as the Service Manager database. The second computer hosts the Self Service Web Portal and the third one the data warehouse management server and the Data Warehouse databases.
The Service Manager data warehouse is an optimized component for reporting purposes. It can be extended via management packs. The data warehouse and the reporting infrastructure can be used in other System Center products like Configuration Manager as well as Operations Manager.
For more detailed information about the Service Manager data warehouse, check out this Technet article written by Travis Wright back in 2009. As stated in this article, the data warehouse in Service Manager provides three primary functions:
- Offload data from the main Service Manager database to improve performance of the Service Manager database
- Long-term data storage
- Provide data for reports
The data warehouse can sometimes be a bit fragile. There are numerous people out in Technet forums complaining that their data warehouse is broken and sometimes the only solution is to reinstall the DWH. People also tend to think that the data warehouse does contain all the data from Service Manager but this is not the case unfortunately. For example, attachments and the work item history are not synced to the DWH by default.
To avoid problems with your data warehouse, make sure that you wait at least 1 hour before importing a new management pack if you deleted a previous version of the same MP. The data warehouse MPSync job runs every hour and if there exists an MP in the data warehouse which is not (anymore) compatible with the one in Service Manager you will get into troubles. Check this Technet article for more details about data warehouse jobs.
For a lab environment, I do not recommend installing the data warehouse component. Simply because it is very likely to break after some time testing, importing and deleting management packs
Enough with data warehouse basics, lets start with the installation. Service Manager data warehouse setup depends on some prerequisites. So before starting with Service Manger 2016 data warehouse installation, we need to make sure that these are installed. The following prerequisites are needed to successfully install Service Manager 2016 data warehouse management server:
- .NET Framework 3.5
- SQL Server 2014 Analysis Management Objects
- SQL Server 2012 Native Client
Besides installing the above mentioned prerequisites, you will need five service accounts for this setup, where the Service Manager Service Account has to be member of the local administrators group of the server where you are installing the data warehouse management server:
- SQL Server Service Account
- Service Manager Service Account
- Reporting Services Account
- Analysis Services Account
Important: Make sure that you run Service Manager setup with a domain user which has appropriate permissions on the corresponding SQL server instance (sysadmin) as well as local administrator permissions for the server where you are installing Service Manager.
Install SQL Server 2016
As with the installation of the primary management server, we will get started by installing SQL Server 2016. Basically Service Manager is doing pretty good with an ordinary SQL instance. However, Service Manager is heavily dependent on SQL Server performance. I am no SQL expert and will not go into any details about SQL Server tuning. I recommend reviewing your production SQL installation for best practices and performance bottlenecks with a SQL expert to get the best out of your Service Manager environment.
Make sure you check out the general SQL recommendations for System Center components found here. This was initially written for System Center 2012 but still applies for 2016.
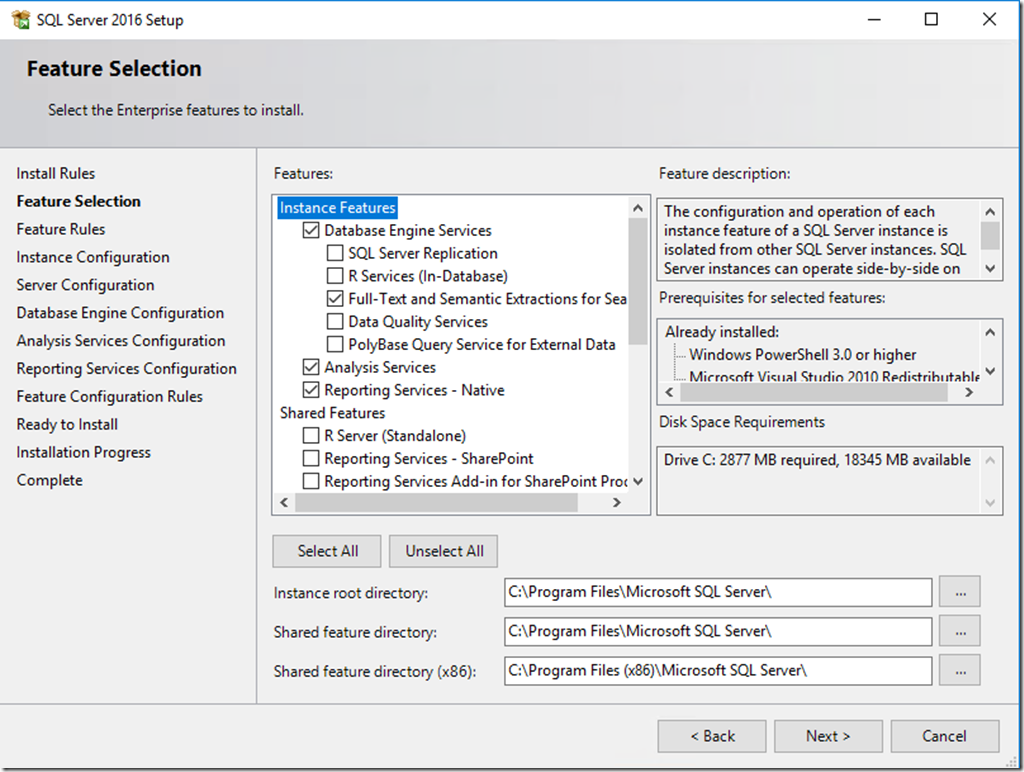
There are nevertheless some things which have to be mentioned in terms of SQL requirements. First of all install SQL Server 2016 with the following features enabled:
- Full-Text and Semantic Extractions for Search
- Analysis Services
- Reporting Services
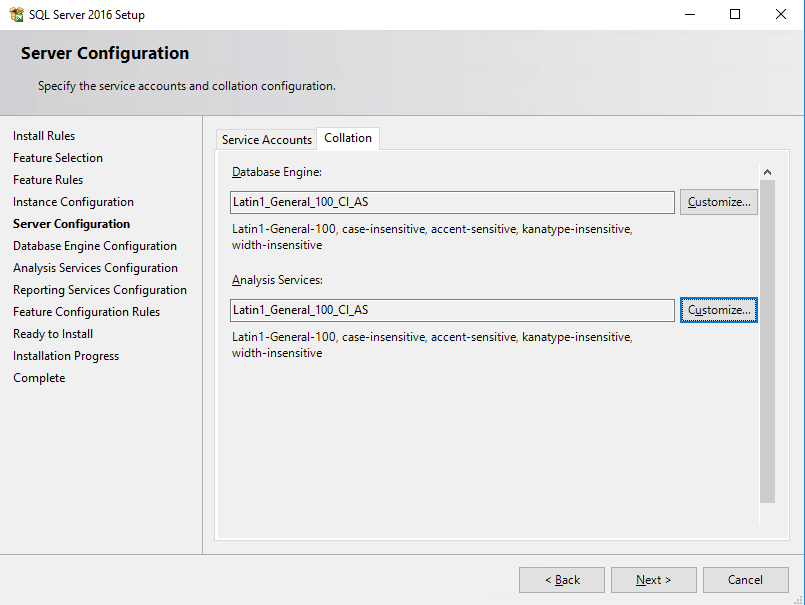
Service Manager is somewhat touchy when it comes to SQL collations. If you haven’t done yet, I recommend reading Clarification on SQL Server Collation Requirements for System Center 2012 and this article on serverfault.com regarding collation settings.
Most people probably will be fine with _Latin1_General_100_CI_AS _which is recommended for Latin based languages like English, German, Italian, Portuguese and Dutch. However be sure to check Language Support for System Center 2012 – Service Manager for the appropriate collation used with your language.
Important: Support for multiple languages in Service Manager is not possible when you are using the default collation (SQL_Latin1_General_CP1_CI_AS). If later you decide to support multiple languages using a different collation, you have to reinstall SQL Server. Also make sure that you use the same collation for your data warehouse database as you did for the Service Manager database:
The collation used must be the same for the computers hosting the Service Manager database, data warehouse database, analysis services database, and Reporting Services database.
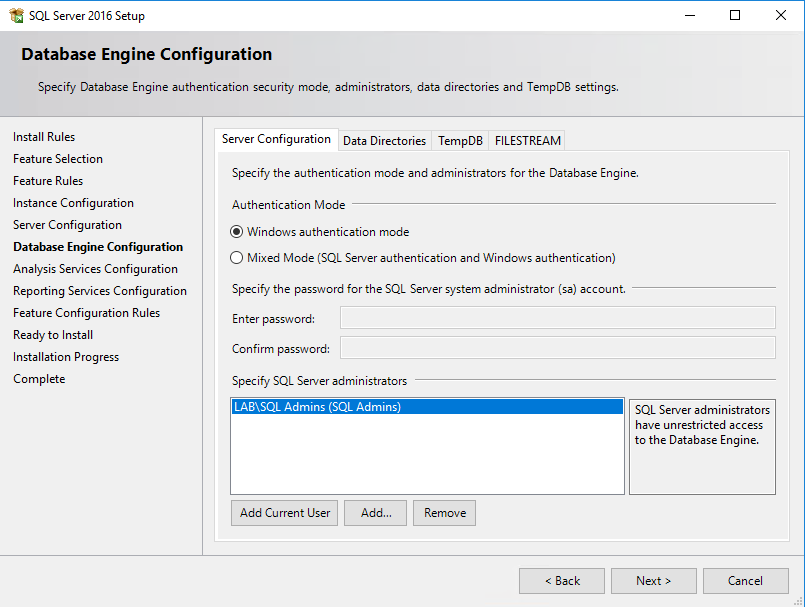
After dealing with collations, make sure that you specify a group of SQL server administrators which will have unrestricted access to the database engine.
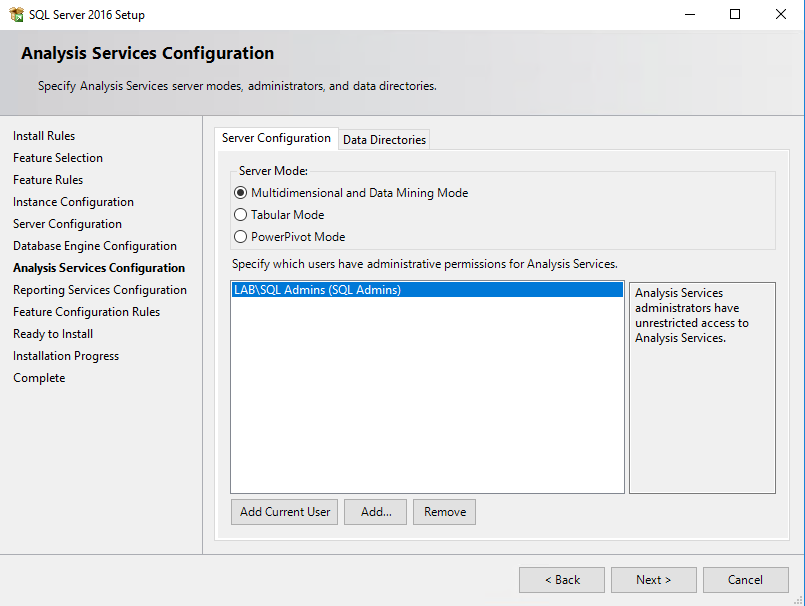
Since we are installing Reporting and Analysis Services, some additional configuration is needed compared to the Service Manager management server installation. First of all make sure that you add an appropriate group of Analysis Services administrators which will have unrestricted access to Analysis Services.
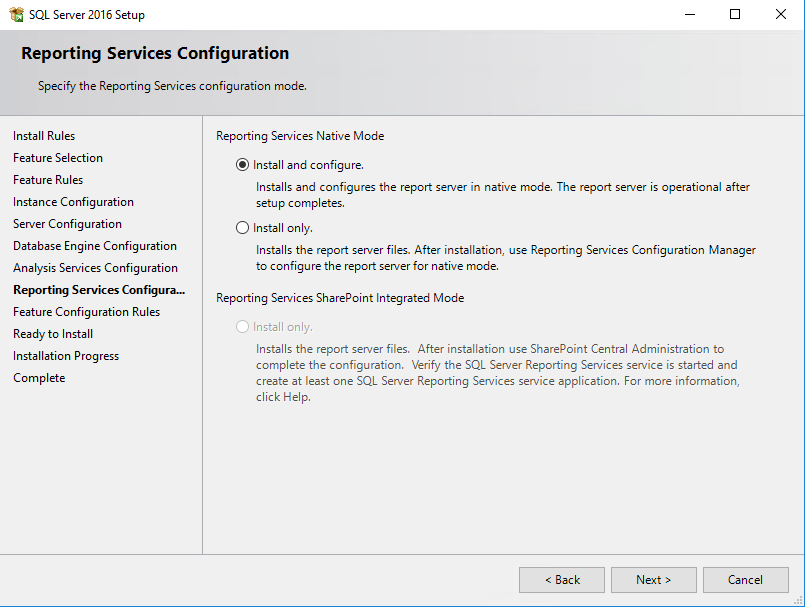
When it comes to the configuration of the reporting services, you are good to go with the Install and configure option. This will give you a fully operational report server after SQL installation is finished.
Install Prerequisites
When installing the Service Manager data warehouse server, you will need exactly the same prerequisites as with the primary management server. Although Service Manager 2016 now supports .NET Framework 4.5.1, you will need to install version 3.5. Setup wizard will tell you if .NET Framework 3.5 is missing and you will not be able to continue the setup process.
Besides .NET Framework, you will need to install Microsoft SQL Server 2014 Analysis Management Objects (AMO) which you can get from here (watch out for SQL_AS_AMO.msi). You may need to install SQL Server 2012 Native Client as well if your SQL Server is installed on another computer (which is not the case in this scenario). Don’t worry because the setup wizard will tell you to do so when installing Service Manager on a separate server. If you need SQL Server 2012 Native Client you can get it from here (watch out for sqlncli.msi)
Manual Steps to Configure the Remote SQL Server Reporting Services
If you specify a remote server as SQL Report Server you need to perform some manual steps to configure the remote SSRS server.
Important: This is not necessary if you are installing Service Manager data warehouse server on the same machine as SQL Report Server is installed (as outlined in this scenario). In this case Service Manager setup will add necessary dll file as well as code segment and extension tag.
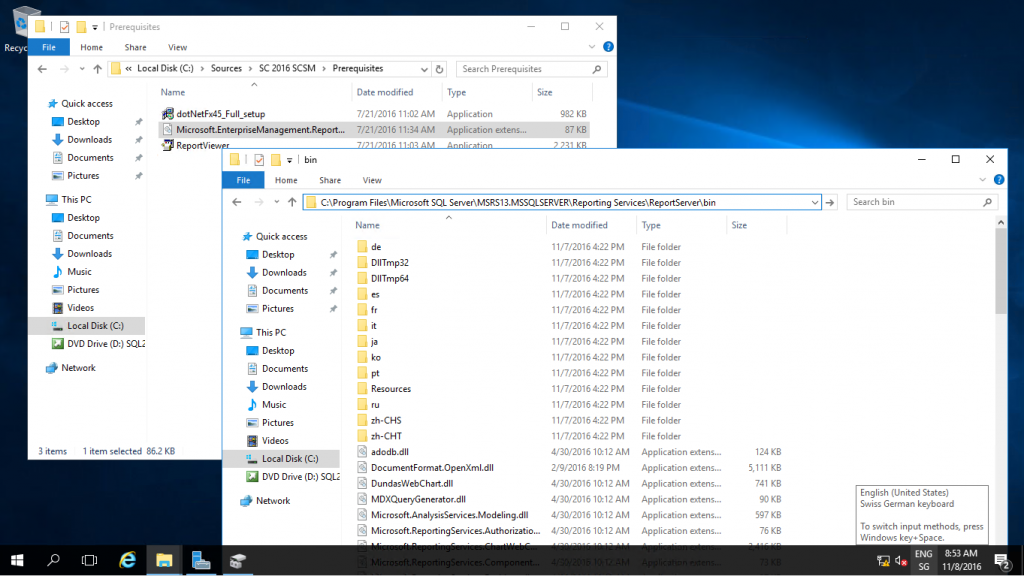
Assuming you are using SQL Server 2016, you will need to copy Microsoft.EnterpriseManagement.Reporting.Code.dll (which is located in the Prerequisites folder on your Service Manager installation media) to the folder C:\Program Files\Microsoft SQL Server\MSRS13.MSSQLSERVER\Reporting Services\ReportServer\bin on the computer that is hosting SSRS.
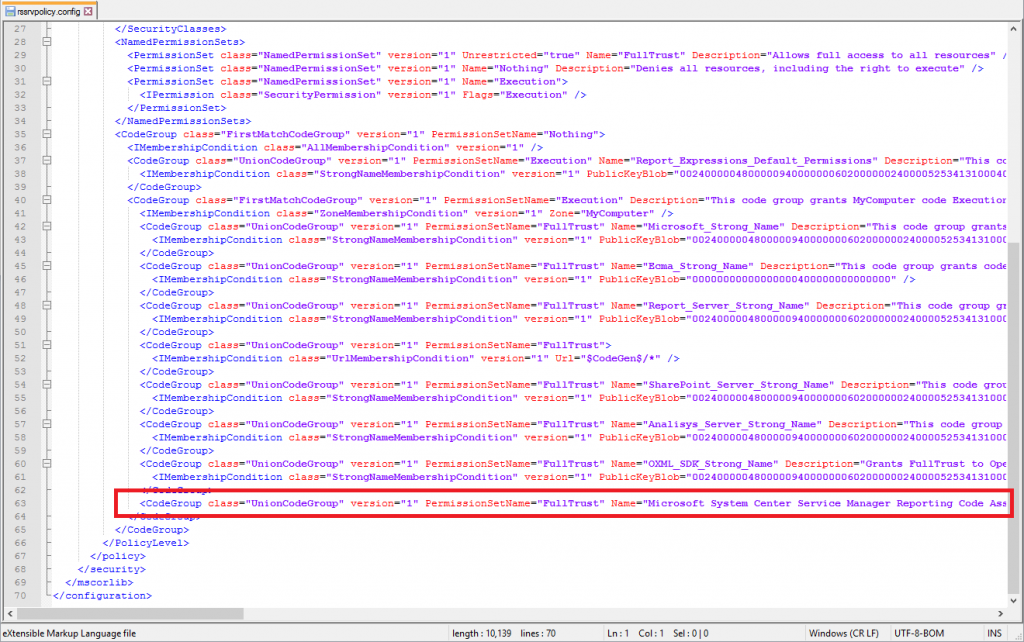
Furthermore you will need to manually add the following code segment to Rssrvpolicy.config in the folder C:\Program Files\Microsoft SQL Server\MSRS13.MSSQLSERVER\Reporting Services\ReportServer
    <CodeGroup
       class="UnionCodeGroup"
       version="1"
       PermissionSetName="FullTrust"
       Name="Microsoft System Center Service Manager Reporting Code Assembly"
       Description="Grants the SCSM Reporting Code assembly full trust permission.">
       <IMembershipCondition
          class="StrongNameMembershipCondition"
          version="1"
          PublicKeyBlob="0024000004800000940000000602000000240000525341310004000001000100B5FC90E7027F67871E773A8FDE8938C81DD402BA65B9201D60593E96C492651E889CC13F1415EBB53FAC1131AE0BD333C5EE6021672D9718EA31A8AEBD0DA0072F25D87DBA6FC90FFD598ED4DA35E44C398C454307E8E33B8426143DAEC9F596836F97C8F74750E5975C64E2189F45DEF46B2A2B1247ADC3652BF5C308055DA9"
    />
    </CodeGroup>
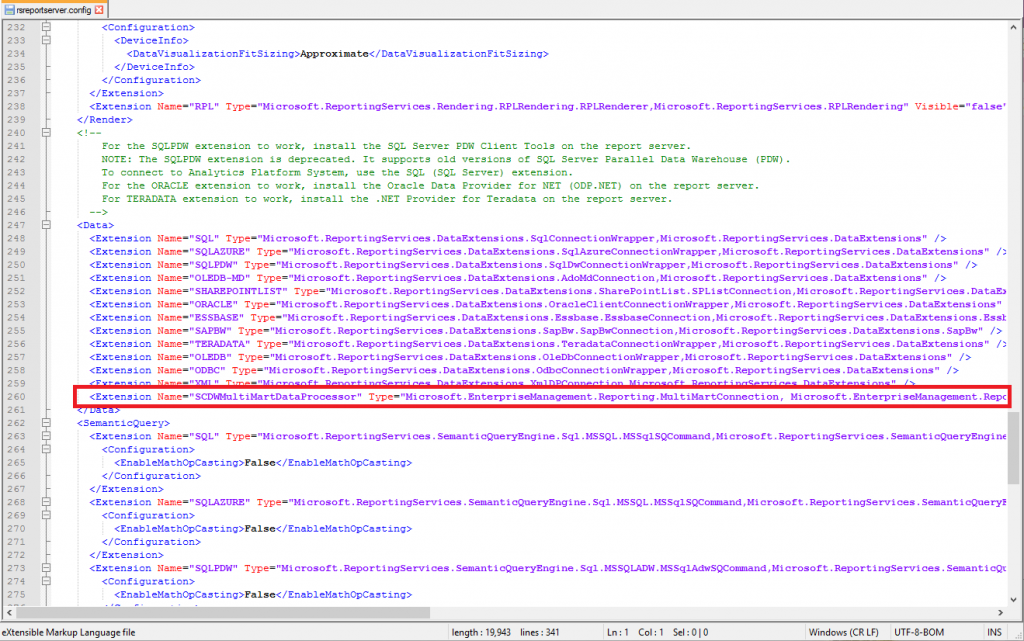
Besides that you need to add the following Extension tag to the Data segment in the rsreportserver.conf file located in C:\Program Files\Microsoft SQL Server\MSRS13.MSSQLSERVER\Reporting Services\ReportServer
<Extension Name="SCDWMultiMartDataProcessor" Type="Microsoft.EnterpriseManagement.Reporting.MultiMartConnection, Microsoft.EnterpriseManagement.Reporting.Code" />
For further details check out the Technet article outlining the steps above for Service Manager 2012 and SQL 2008. It is still valid for Service Manager 2016.
Install Service Manager Data Warehouse
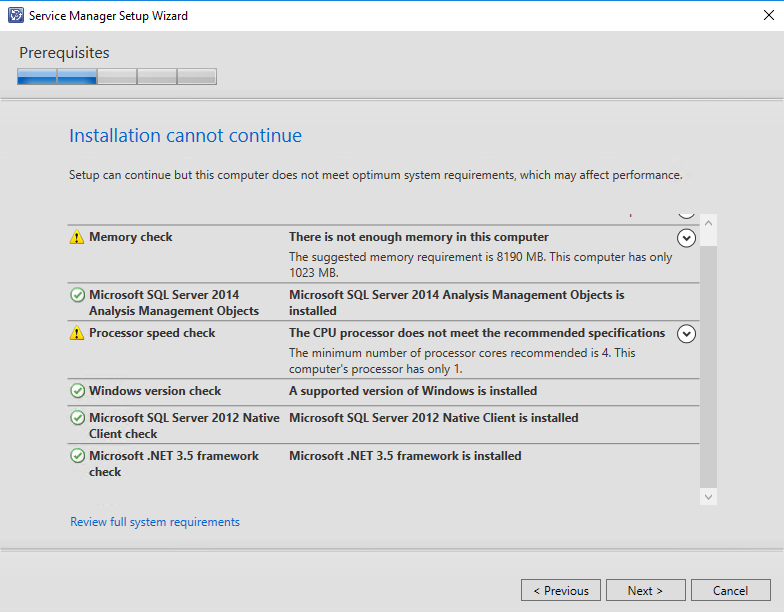
Now let’s get started with Service Manager Data Warehouse setup! If you installed all the necessary prerequisites, you should see a similar screen after entering product key and continuing in the setup wizard.
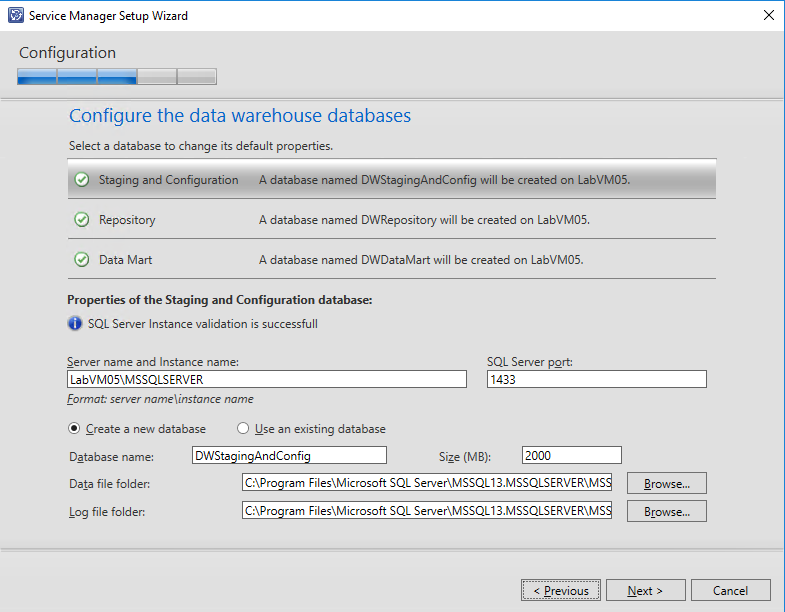
Next specify SQL Server and Instance name where Service Manager should create its data warehouse databases. Make sure that corresponding ports are open when using a separate SQL Server with firewall enabled. This should not be a problem in this scenario since SQL server is installed on the same computer. Note that since Service Manager 2016, setup also supports SQL AlwaysOn installations.
Note that if you are using the default collation (SQL_Latin1_General_CP1_CI_AS), a warning message appears which you should read carefully. As stated in the beginning of this post, support for multiple languages in Service Manager is not possible when using the default collation.
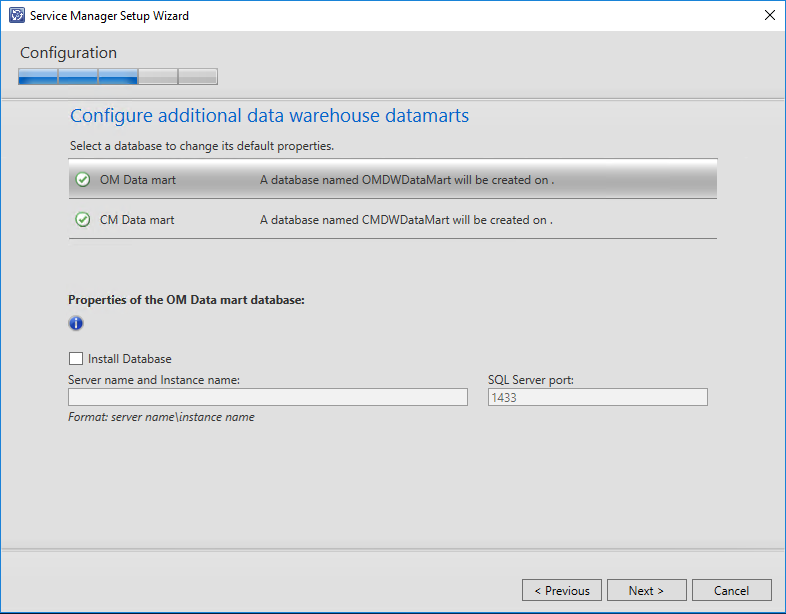
We will not create Operations Manager and Configuration Manager data warehouse databases in this scenario.
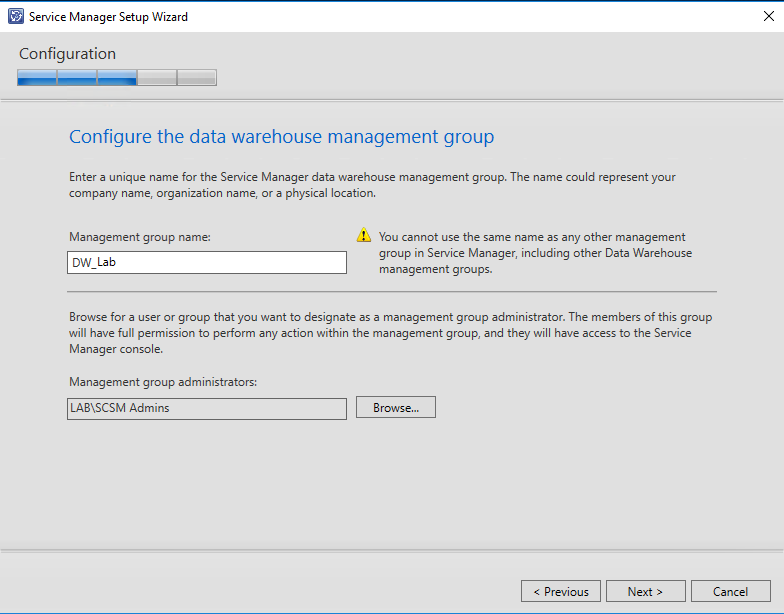
Next up we will define the name of the new Service Manager management group. Management group names must be unique.
Important: Do not use the same management group name even when you are deploying a Service Manager management server and a Service Manager data warehouse management server. Furthermore, do not use the management group name that is used for Operations Manager.
Besides the management group name, you also want to specify a management group administrators group.
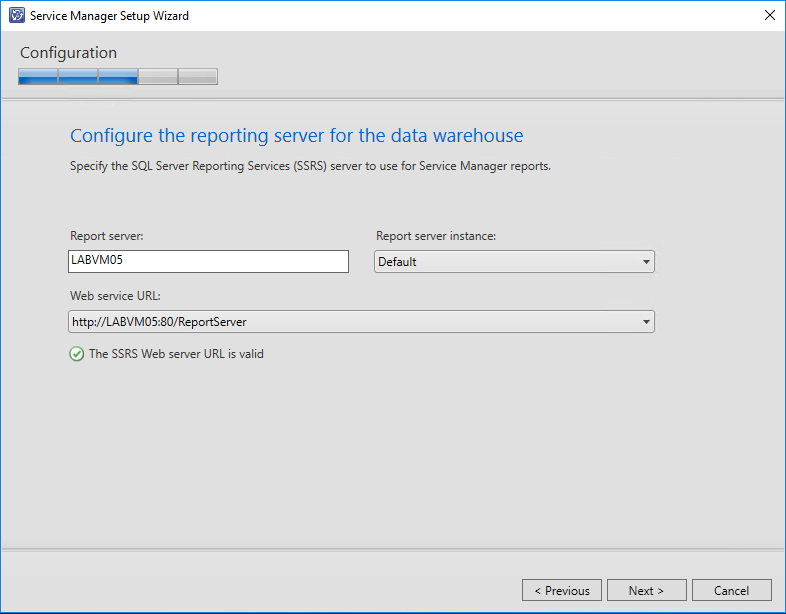
Now specify the SQL Reporting Services server used for your Service Manager reports. If you are working with a remote server you will need to confirm that you have take the manual steps to configure SSRS server as outlined above before being able to continue with the installation.
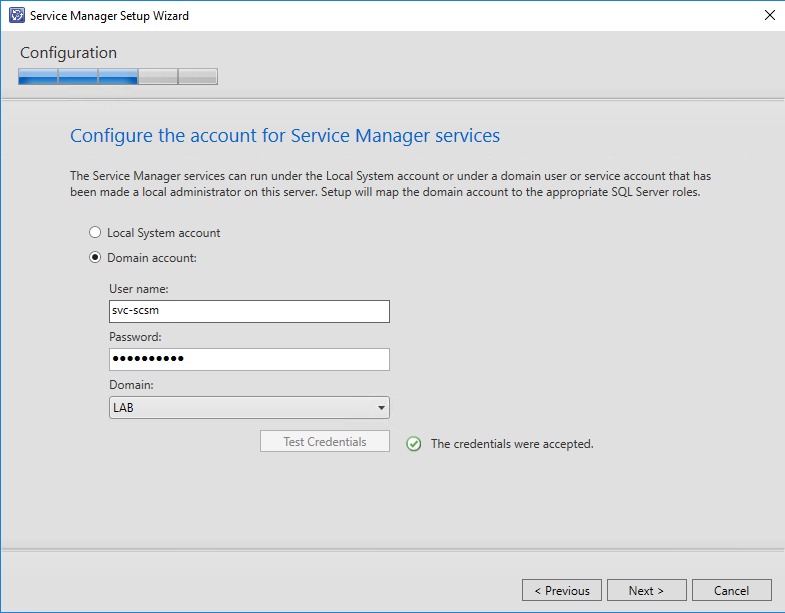
Now enter the credentials of the Service Manager Service Account. It will be assigned to the logon account for the System Center Data Access Service as well as for System Center Management Configuration service. Note that the Service Account has to be member of the computers local administrators group.
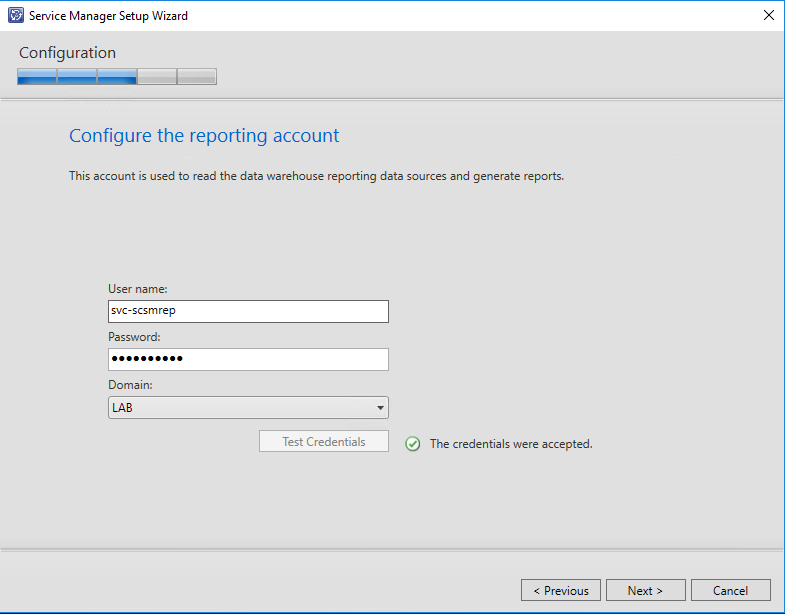
Besides the Service Manager account you will need a reporting account which is used to read data warehouse reporting data sources and to generate reports.
Important: This account will be used to publish OOB reports when registering the data warehouse in Service Manager. The account needs to be member of “Content manager” role for the newly created “ServiceManager” folder on your specified Report Server.
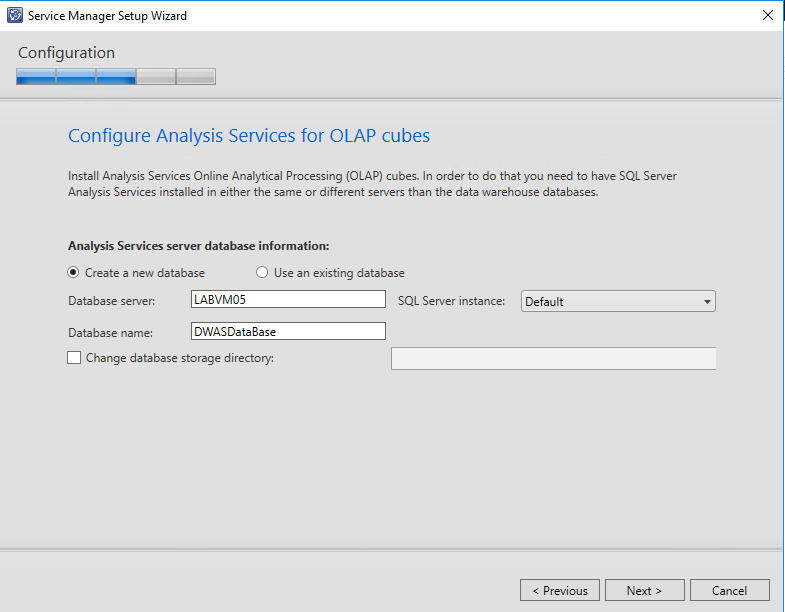
And last but not least you will need to specify Analysis Services server used for OLAP cubes.
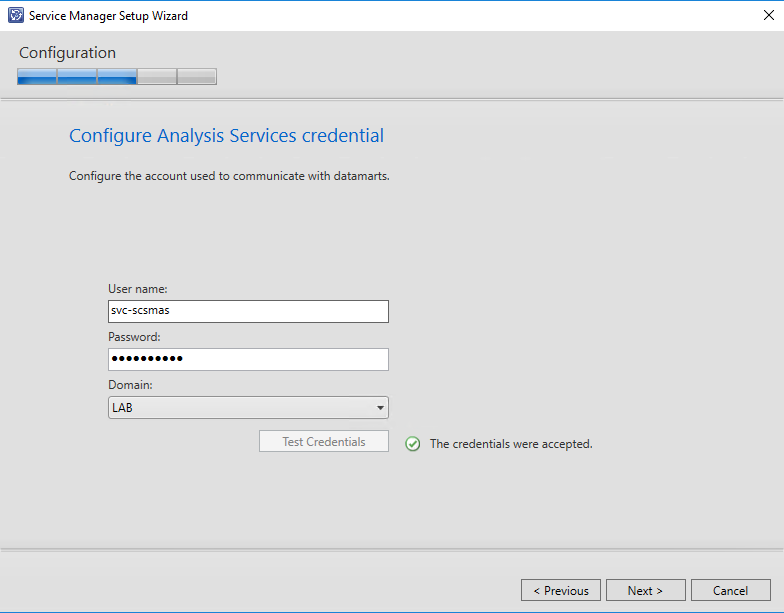
Of course you will need a analysis services account which is used to connect to the data warehouse datamart databases. Setup will create a corresponding login for the affected databases.
That’s pretty much it for the installation of a data warehouse management server. You do not necessarily need to backup your encryption key since we already did that when installing our primary management server.
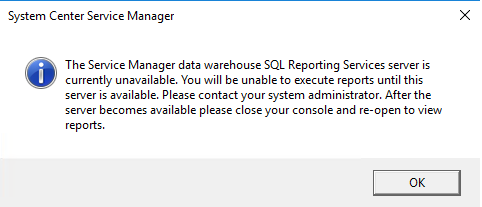
To be able to view reports from Service Manager console, the newly created Report Server has to be accessible over port 80. Check if an appropriate firewall rule exists on your Report Server otherwise you will see a message telling you that the data warehouse SQL Reporting Services server is currently unavailable when starting your Service Manager console
An appropriate rule which allows inbound traffic on port 80 can be created as follows:
New-NetFirewallRule -Name Allow_HTTP -DisplayName "Allow HTTP" -Description "Allow access to Report Server for SCSM" -Protocol TCP -LocalPort 80 -Direction Inbound -Enabled True -Profile Any -Action Allow
There is one final step we need to perform and this is setting the SPN’s (Service Principal Names) for Service Manager as we already did for our primary and secondary management servers. Refer to Configure the Kerberos for SCSM 2012 (SPN and delegation) published by Anton Gritsenko for more detailed information about Service Manager and SPN’s. The post was originally written for Service Manager 2012 but its content is still valid for Service Manager 2016.
Assuming that you configured an Active Directory account as Service Account, create necessary SPN’s like the following for each Service Manager management server:
    setspn.exe -S MSOMSdkSvc/LabVM05 Lab\svc-scsm
    setspn.exe -S MSOMSdkSvc/LabVM05.lab.jhnr.ch Lab\svc-scsm
    setspn.exe -L Lab\svc-scsm
    Registered ServicePrincipalNames for CN=SCSM Service Account,CN=Users,DC=lab,DC=jhnr,DC=ch:
            MSOMSdkSvc/LabVM05.lab.jhnr.ch
            MSOMSdkSvc/LabVM05
            MSOMSdkSvc/LabVM04.lab.jhnr.ch
            MSOMSdkSvc/LabVM04
            MSOMSdkSvc/LabVM03.lab.jhnr.ch
            MSOMSdkSvc/LabVM03
You should now have SPN’s configured for all of your Service Manger management servers (two in this scenario) as well as for your data warehouse management server.
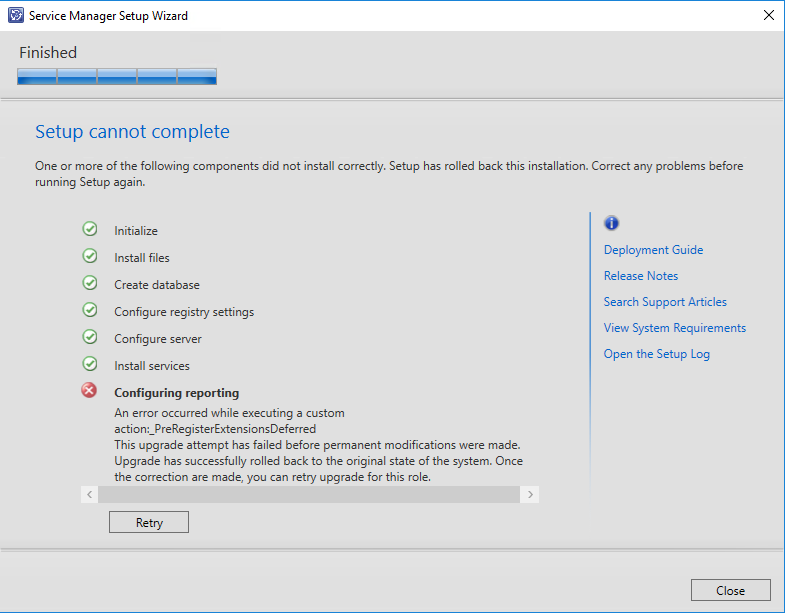
When your installation fails and you see the below error message, check the setup log (which can be found in ‘C:\Users<User>\AppData\Local\Temp’) for the following error:
AssignSsrsRole Error: System.Web.Services.Protocols.SoapException : System.Web.Services.Protocols.SoapException: The user or group name ‘BUILTIN\BUILTIN’ is not recognized. —> Microsoft.ReportingServices.Diagnostics.Utilities.UnknownUserNameException: The user or group name ‘BUILTIN\BUILTIN’ is not recognized
If this is the case, check out my blog post on how this might be resolved :-)
Register Data Warehouse
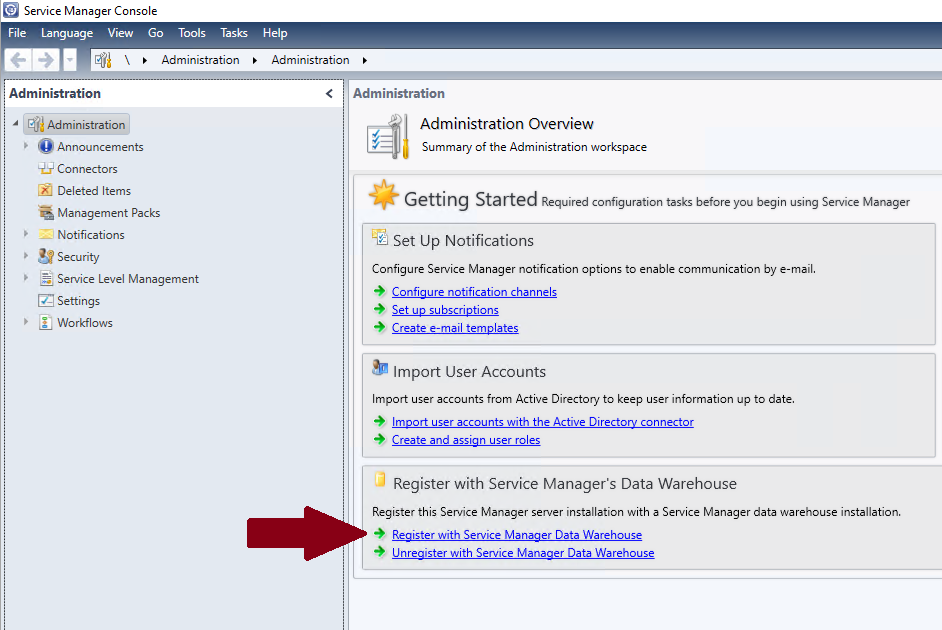
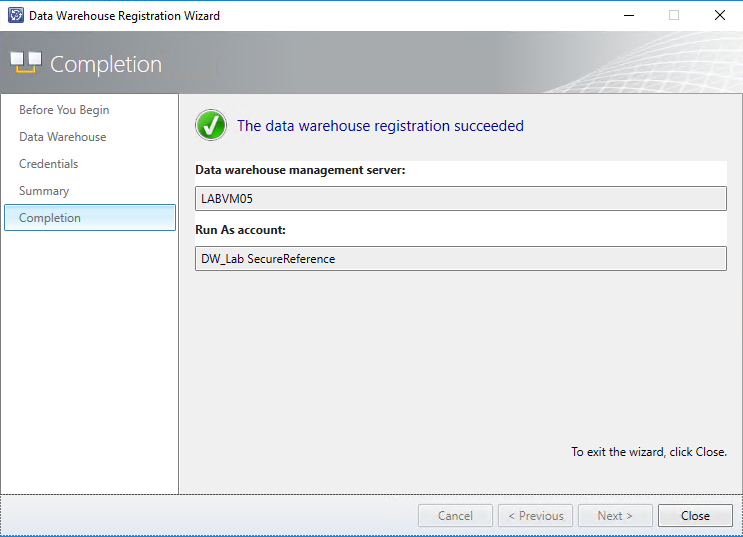
Now that you have successfully installed your data warehouse management server, it is time to register the data warehouse to your existing Service Manager environment. This can be easily done by using the Service Manager console.
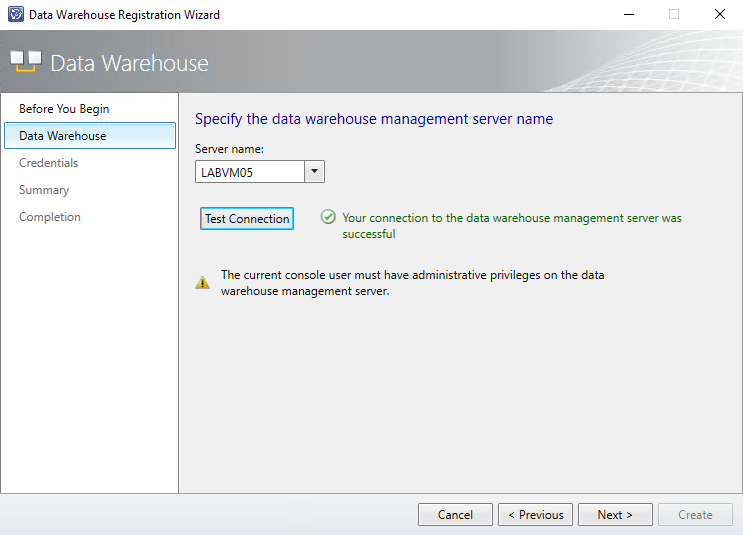
Specify your newly created data warehouse management server and test the connection.
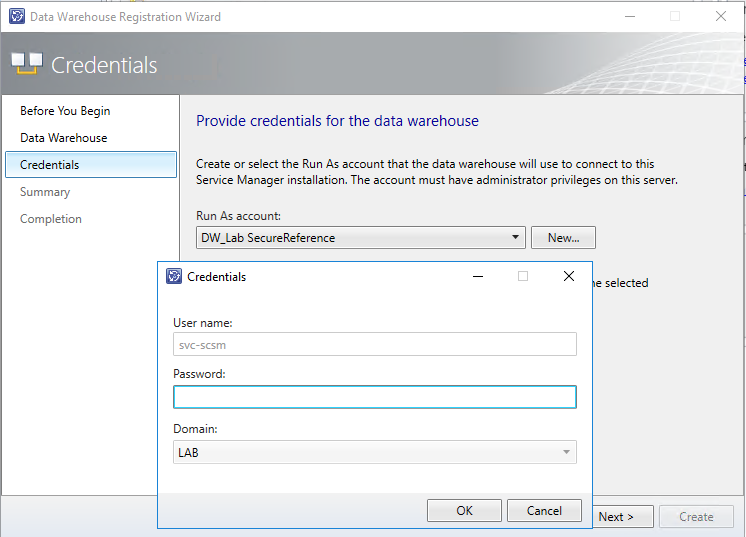
You will need to provide credentials for your Service Manager service account to complete the registration.
After registering the data warehouse, you should see a new workspace named Data Warehouse in your Service Manager console. All existing management packs will be synced, reports will be deployed on your SQL Report Server and new SQL Analysis cubes will be created and processed. This takes quite some time. So register the data warehouse and call it a day :-)
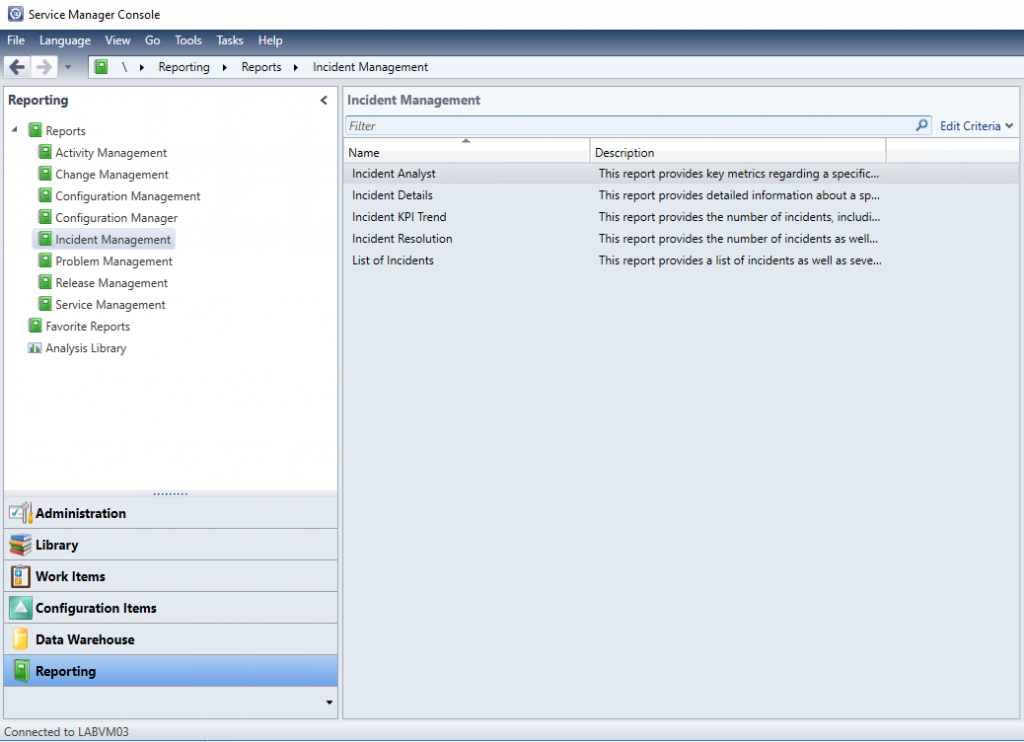
When you start working the day after, you should see another workspace named Reporting. Also check if all management packs are synced successfully to the data warehouse. If this is not the case - especially if report management packs are failed - check the Operations Manager event log on the data warehouse server for errors.
Stay tuned for Part 5 of the blog post series “Installing Service Manager 2016” where I will describe how to get started with your newly created Service Manager environment and what to consider after Service Manager is up and running.

