Using Policy Initiatives to simplify Azure Policy Management
Policies in Azure are great! They can help you to enforce different rules and actions over your resources, so that they stay compliant with your corporate standards. For example they let you control in which location resources have to be deployed or you can have a policy to allow only certain type of virtual machines. Another policy may require that all resources have assigned a certain tag.
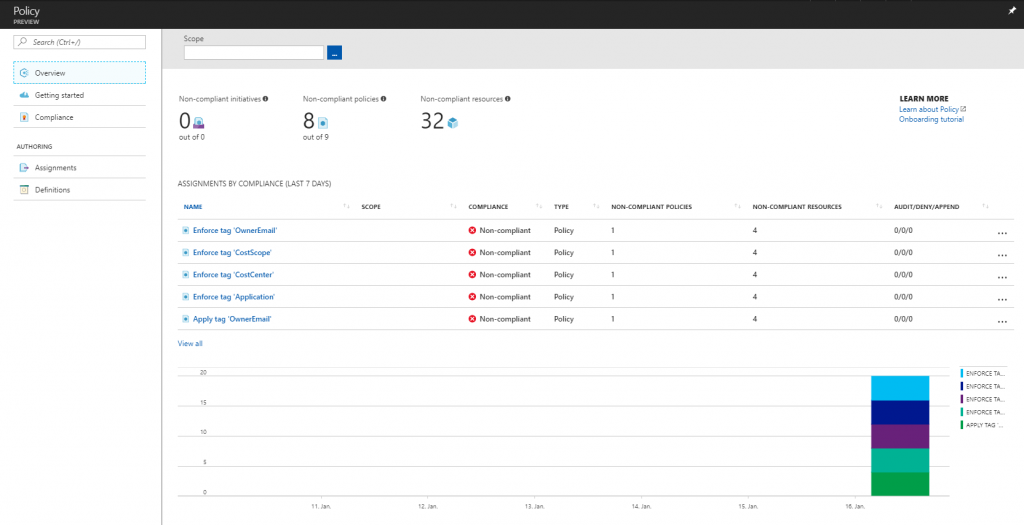
Policies are available for quite some time now. But when you were working with policies already, you probably noticed that management of all policies within one or even more Azure subscriptions can be challenging. That is why Microsoft announced a brand new UI for Azure Policy at Ignite conference 2017. It enables you to manage policies easily across many subscriptions in one single place and even monitors compliance status of your resource
Another thing which was announced at Ignite 2017 are policy initiatives. A policy initiative groups together several policies. Look at it as one set of policies. Using initiatives greatly reduces the number of policy assignments you need to manage. For example when using tags to group your billing data. Typically you may have around five tags which should be applied to figure out who is going to pay for that resources. Policies are a great tool to make sure these tags are actually applied and enforced.
Unfortunately as your environment grows, you will have a lot of policy assignments. In case of five billing tags, you will have a total of 10 policy assignments (apply and enforce) for each scope (typically a resource group). This makes management of policies very hard. That’s where policy initiatives come in handy. Instead of assigning 10 policies to each resource group, you can now group these policies in an assignment (also known as policy set) and just assign the newly created assignment to your resource groups.
Creating initiative definitions
Initiative definitions can be created and assigned using the portal, PowerShell or Azure CLI. Like with policies, there are some built-in initiatives available and you can create your own custom initiatives. One challenge to adopting initiatives is constructing the JSON template. There exists an Azure Policy Repository which contains quick-start samples from the community which you may want to check out.
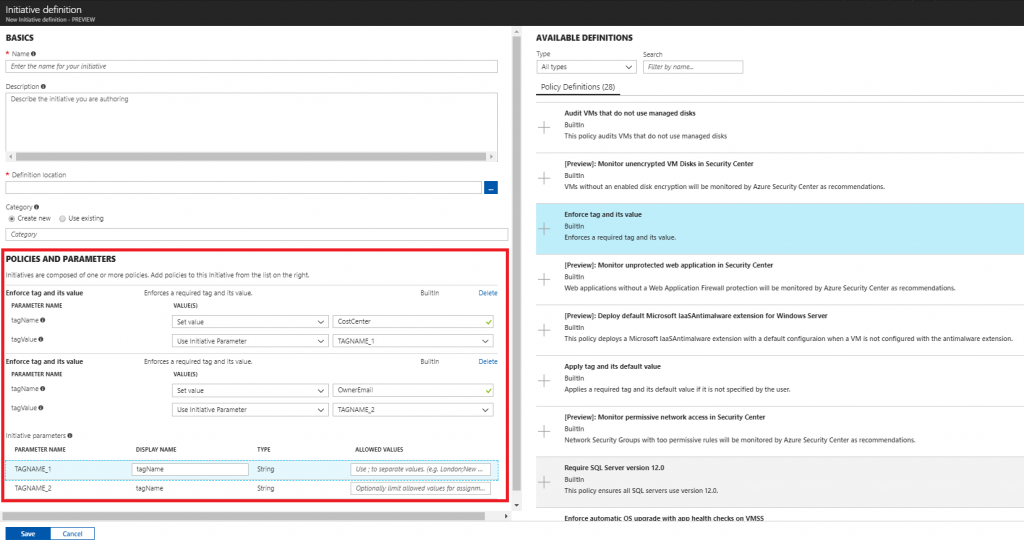
Creating an initiative in the portal is pretty straight forward. Navigate to Azure Policy and create a new initiative. You can then add one or more policies and also define corresponding parameters. It is highly recommended that you use initiative parameters to make sure your initiative can be reused in various scenarios. In case of a tagging initiative, you may want to set a static value for your tag names and an initiative parameter for tag values because the values probably are different depending on the project for which the tags should be applied.
When defining an initiative using PowerShell you need both a initiative definition and parameters JSON file. In the definition file below the policy definitions used represent Apply and Enforce tag built-in policies.
    [
        {
            "policyDefinitionId": "/providers/Microsoft.Authorization/policyDefinitions/1e30110a-5ceb-460c-a204-c1c3969c6d62",
            "parameters": {
                "tagName": {
                    "value": "CostCenter"
                },
                "tagValue": {
                    "value": "[parameters('costCenterValue')]"
                }
            }
        },
        {
            "policyDefinitionId": "/providers/Microsoft.Authorization/policyDefinitions/2a0e14a6-b0a6-4fab-991a-187a4f81c498",
            "parameters": {
                "tagName": {
                    "value": "CostCenter"
                },
                "tagValue": {
                    "value": "[parameters('costCenterValue')]"
                }
            }
        },
        {
            "policyDefinitionId": "/providers/Microsoft.Authorization/policyDefinitions/1e30110a-5ceb-460c-a204-c1c3969c6d62",
            "parameters": {
                "tagName": {
                    "value": "OwnerEmail"
                },
                "tagValue": {
                    "value": "[parameters('ownerEmailValue')]"
                }
            }
        },
        {
            "policyDefinitionId": "/providers/Microsoft.Authorization/policyDefinitions/2a0e14a6-b0a6-4fab-991a-187a4f81c498",
            "parameters": {
                "tagName": {
                    "value": "OwnerEmail"
                },
                "tagValue": {
                    "value": "[parameters('ownerEmailValue')]"
                }
            }
        }
    ]
In addition to the definition file you also need to specify a parameters file like the one below.
    {
        "costCenterValue": {
            "type": "String",
            "metadata": {
                "displayName": "required value for CostCenter tag"
            }
        },
        "ownerEmailValue": {
            "type": "String",
            "metadata": {
                "displayName": "required value for OwnerEmail tag"
            }
        }
    }
The initiative definition can then be created based on the above JSON templates. The definitions need to be created for each subscription where you want them to be available.
    $policyDefinitionFile = 'azurepolicyset.definition.json'
    $policyParametersFile = 'azurepolicyset.parameters.json'

    $policySetName = "BillingTagInitiative"
    $policySetDisplayName = "Billing Tags Policy Initiative"
    $policySetDescription = "Specify tags used for billing (e.g. CostCenter and OwnerEmail)"

    New-AzureRmPolicySetDefinition -PolicyDefinition $policyDefinitionFile -Parameter $policyParametersFile -Name $policySetName -DisplayName $policySetDisplayName -Description $policySetDescription -Verbose
There are some general tips and tricks to follow when creating initiatives in the portal. Keep in mind that the Azure Policy feature is still in preview. The product team is working hard on improving the portal experience and you can expect them to release new features and bug fixes on a rapid pace.
- Initiatives can only contain policies which are located in the same subscription. This means that if you have multiple subscriptions where you want to create the same initiative, you would need to deploy all the necessary policies accordingly in every subscription.
- Considering the above, you may want to name your custom initiatives and policies in a way that you can differentiate which of them belong to what subscription. Otherwise you will end up with a pretty long list of policies and initiative definitions for which it is not always obvious to which subscription they belong. The UI allows you to filter based on subscriptions though.
- If you create an initiative in the portal and add a custom policy, make sure that you first select the definition location. Otherwise you will not see any custom policies. This is because custom policies are always bound to a subscription. The UI probably needs to know the location of the initiative first before it can evaluate which policies can be selected.
- When deleting assignments bound to a resource group which has configured a DELETE lock, deleting the assignment will fail and you will the an error saying"Please try again later". Just delete the resource group lock and it will successfully delete the assignment
Assigning initiatives
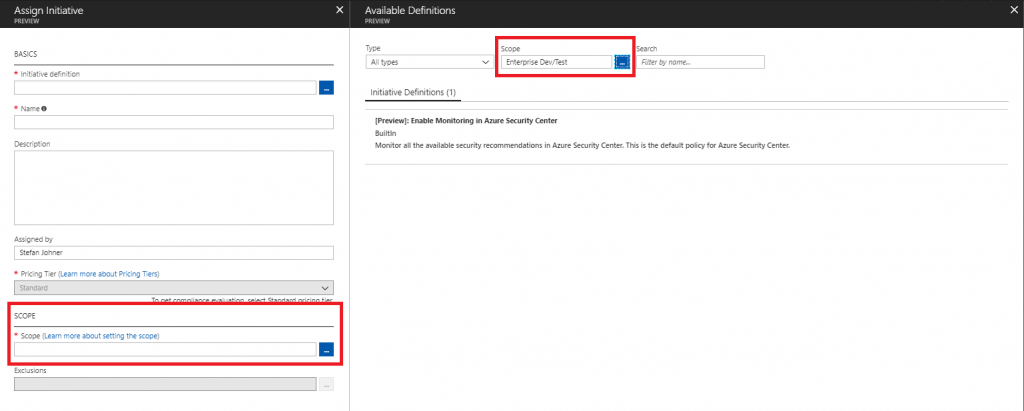
Once you have created your custom initiative definitions you probably want to assign them to your subscriptions and resource groups. As with definitions, initiatives can be assigned easily by using the portal UI, PowerShell or Azure CLI. When using the portal and assigning a custom initiative, make sure that the selected initiative definition is in the same scope as the subscription or resource group you want it to be assigned.
If you want to automate initiative assignment (e.g. you may want to assign some initiatives to each newly created resource group), instead of using the portal you can use the following PowerShell code snippet.
    $resourceGroup = Get-AzureRmResourceGroup -Name $rgName
    $policySetDefinition = Get-AzureRmPolicySetDefinition -Name BillingTagInitiative
    New-AzureRmPolicyAssignment -PolicySetDefinition $policySetDefinition -Name "$rgName - Billing Tags" -Scope $resourceGroup.ResourceId -costCenterValue $costCenter -ownerEmailValue $ownerEmail -Sku @{"Name" = "A1"; "Tier" = "Standard"}
There seems to be an issue with initiative assignments which are created using PowerShell. When editing them in the portal UI (e.g. changing the name of the assignment), it might happen that the assignment cannot be updated correctly. I was told that the product team is working on a fix and I expect it to be deployed in the next few weeks.
Once assigned you are now able to continuously monitor compliance status of your initiatives. You can easily group your policies and look for the non-compliant resources. The policy engine constantly evaluates your resources and updates the compliance status.


